Lalyan Cosmetic Core
Lalyan Cosmetic Core is an API for Hytale that allows players to equip and customize cosmetic items without occupying armor slots.
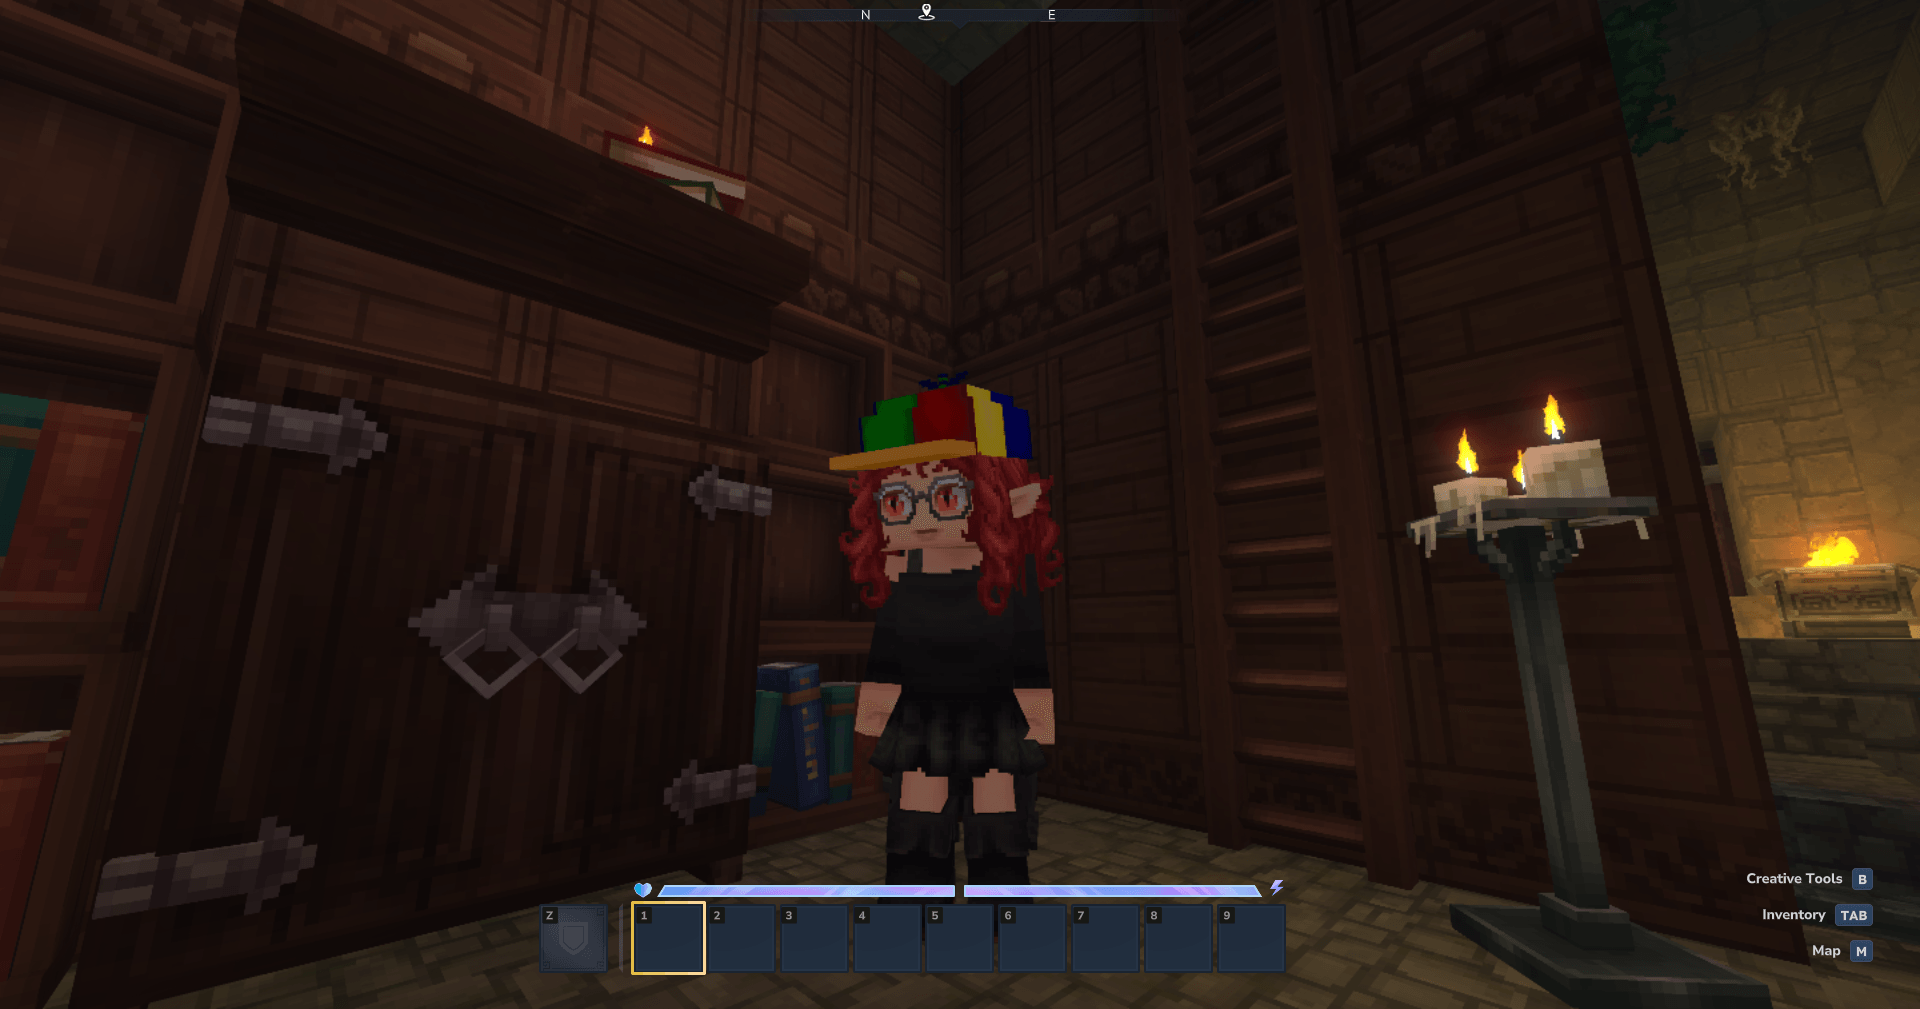
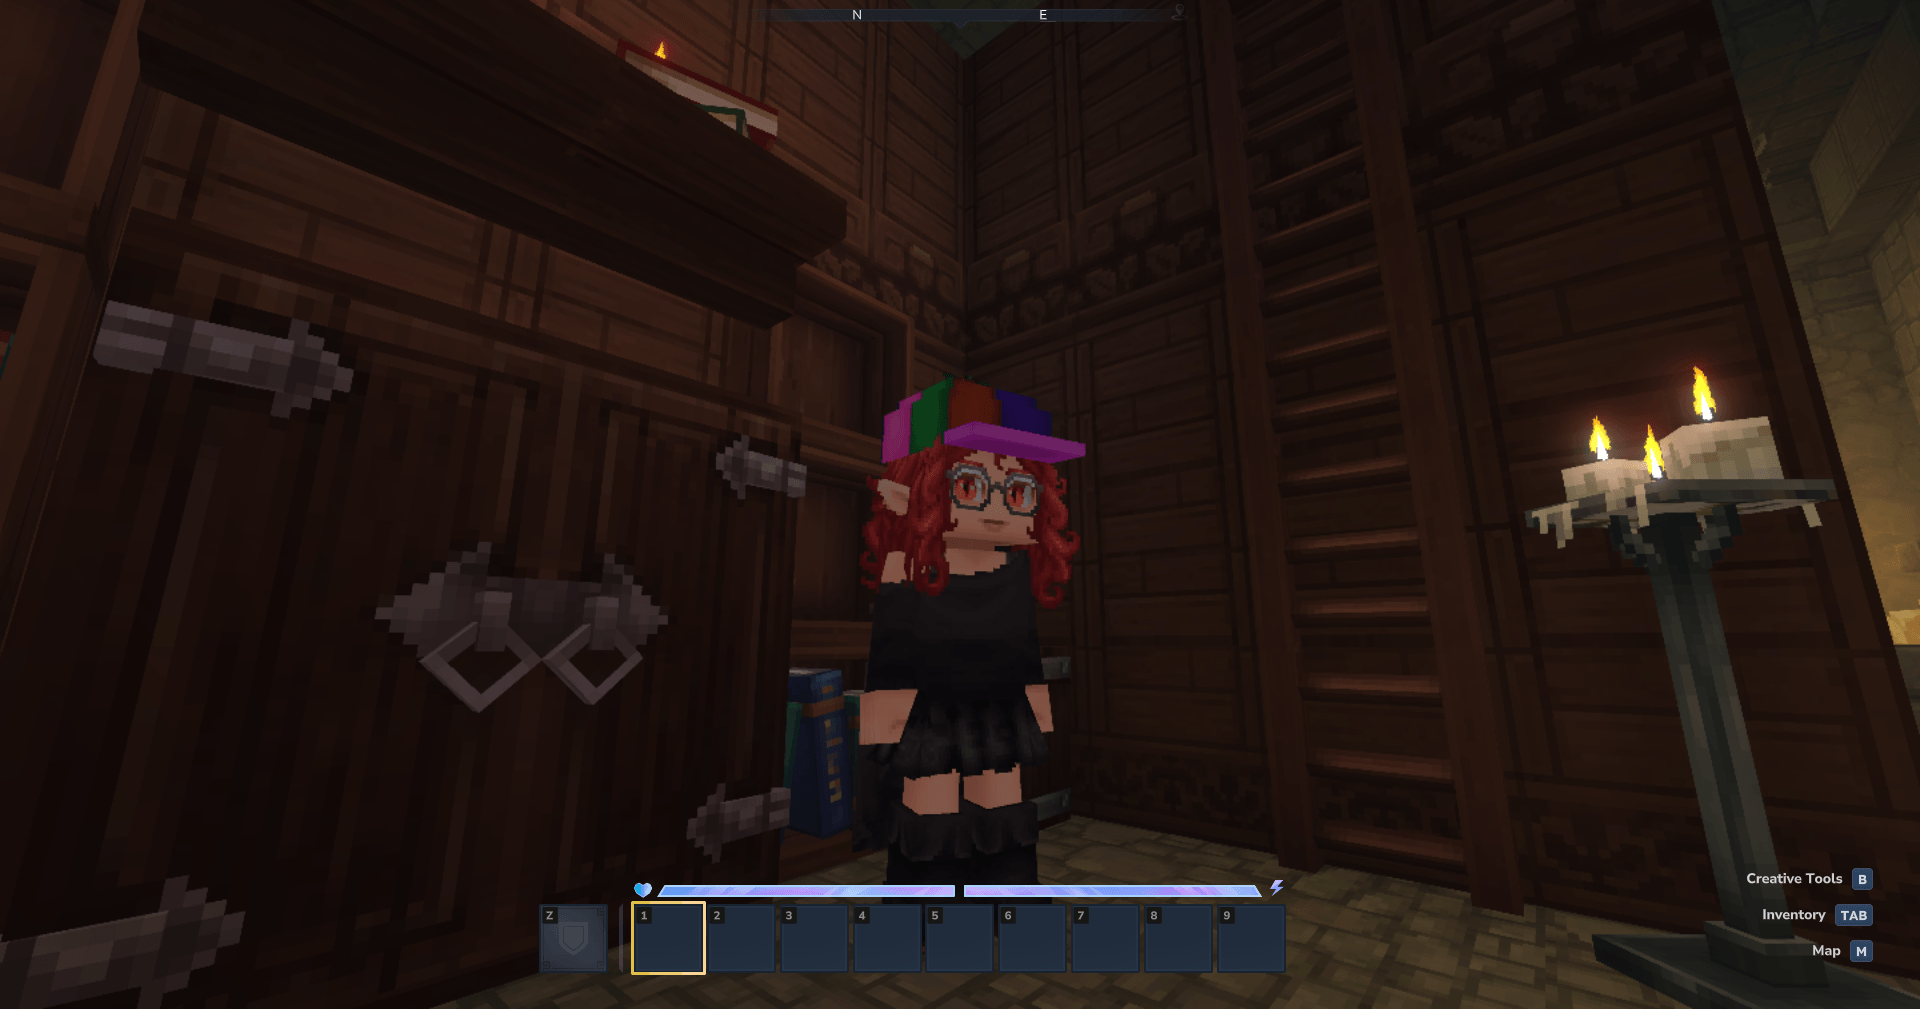
Скриншоты

Описание
английский
Lalyan Cosmetic Core
API для регистрации и настройки косметики без использования броневых слотов
Пользовательская модель шкафа и текстура сделаны Эфирный Шигуре.
Введение
Этот плагин позволяет игрокам настраивать, какую косметику они оборудовали, без необходимости использовать свои слоты для брони.
Это также позволяет производителям плагинов создавать свою собственную косметику без необходимости использования Java-кода.
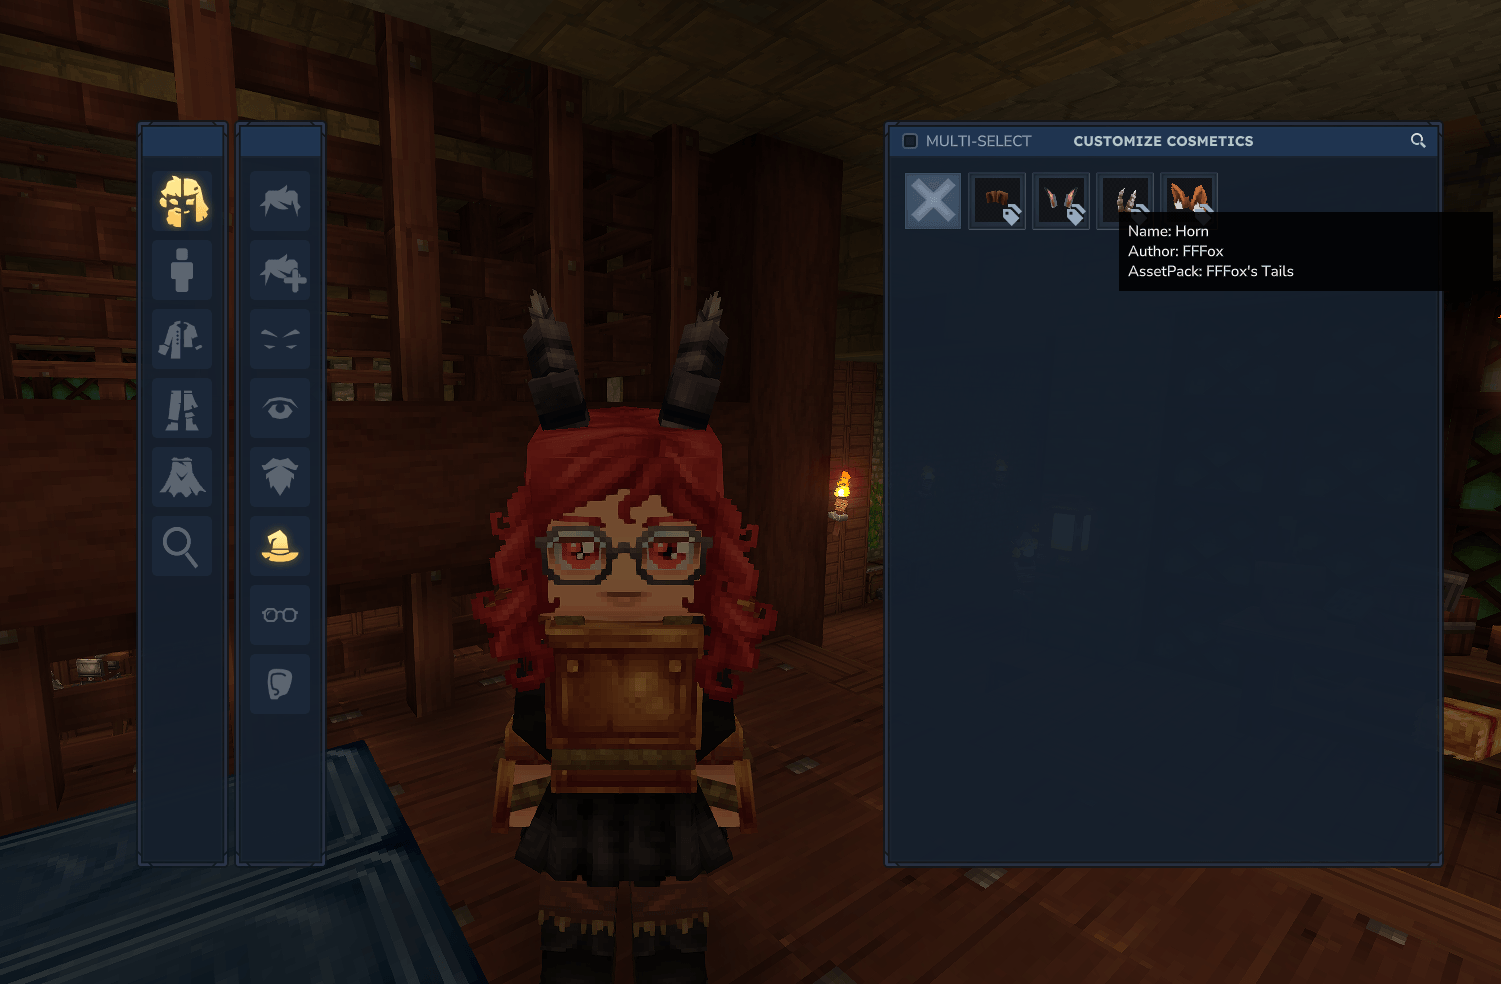
Плагин оснащен пользовательским графическим интерфейсом для настройки косметики, который может быть открыт по команде или, более захватывающим способом, путем создания косметического шкафа.
Косметический шкаф может быть изготовлен в Рабочем столе Строителя, используя 4 из любого Хардвуда.
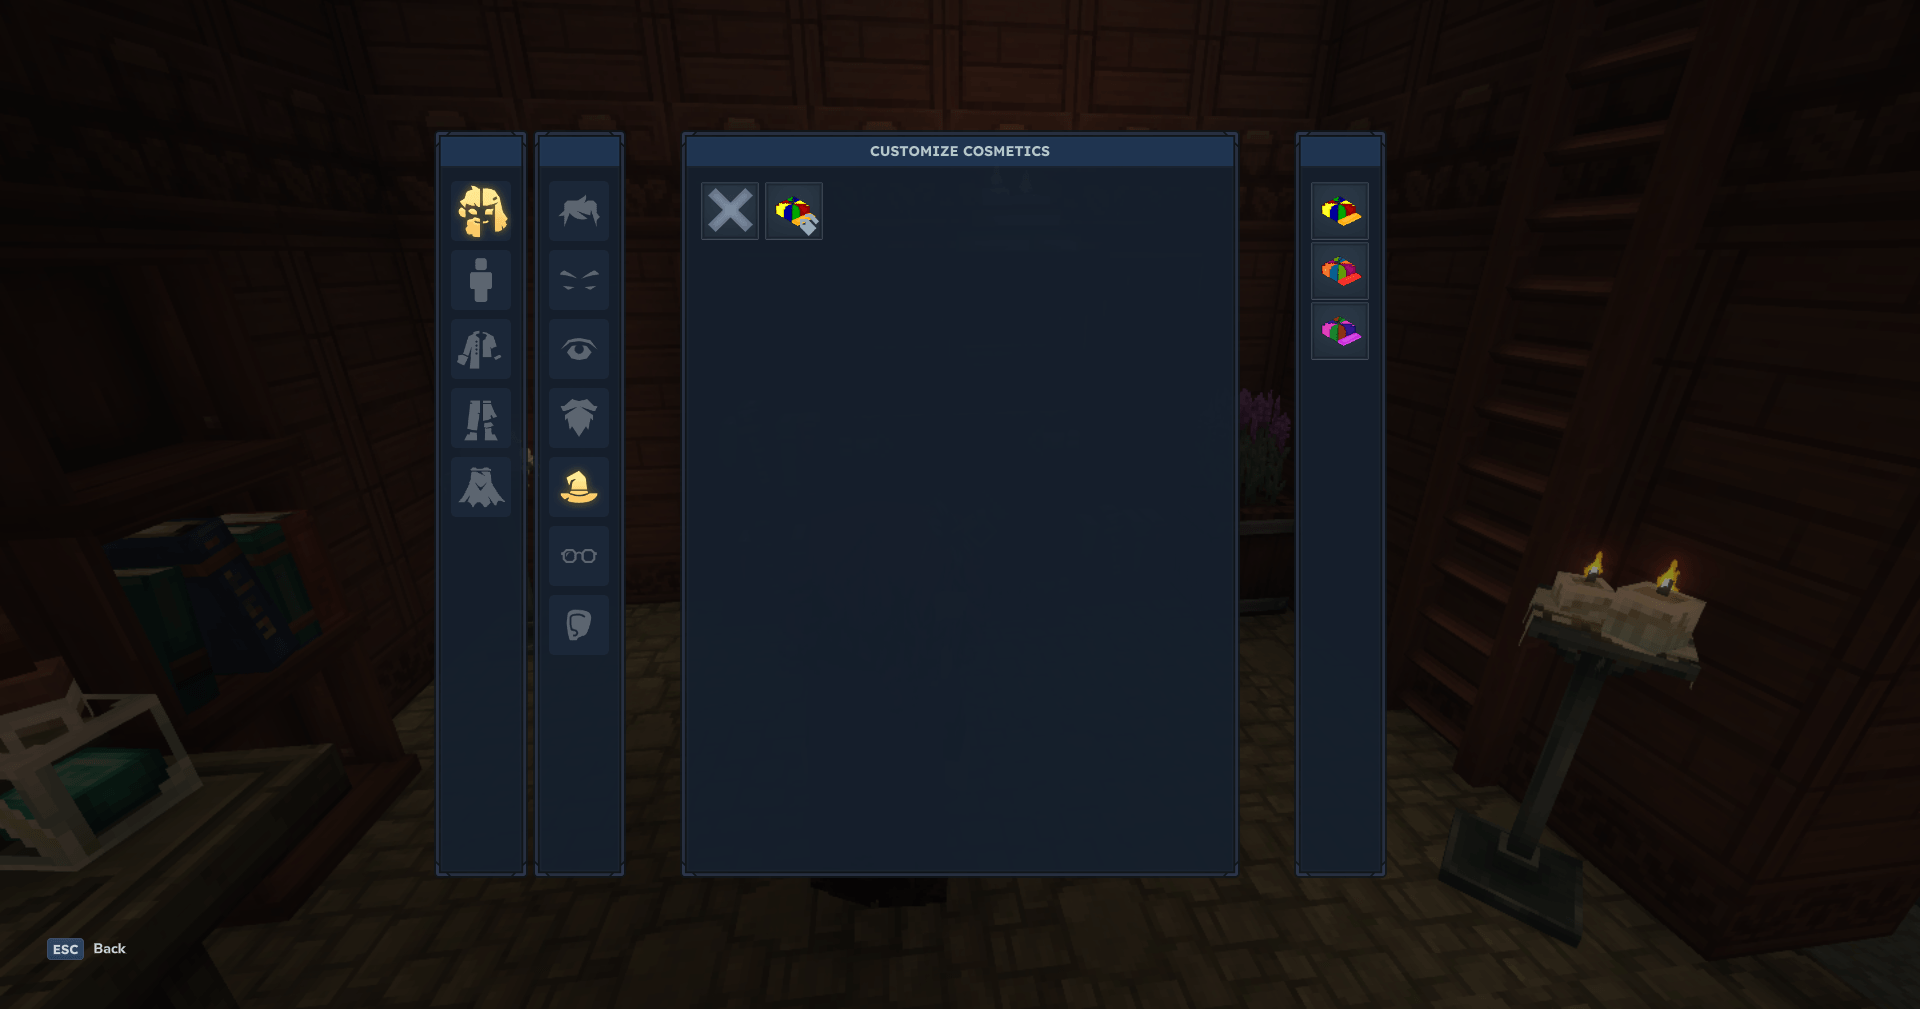
GUI предоставляет простой способ выбора косметики и косметических вариантов. Левый клик на косметику, чтобы оборудовать ее, если у косметики есть значок варианта, правый клик на него, чтобы открыть меню варианта!
командование
Плагин имеет несколько команд, которые в основном предназначены для тестирования:
/cosmetic apply <CosmeticId> [override]Вручную применяется определенная косметика, определяемаяКосметическая Id,отменятьявляется необязательным, по умолчаниюДа (другой ценности нет)Определяет, следует ли удалять все другие косметические средства такого типа. Требуется OP/косметические измененияРучно открывается пользовательский интерфейс косметической настройки. Не требует разрешений/косметический списокОтпечатки в чате все загруженные косметические идентификаторы. Требуется OP/косметическая перезагрузкавручную перезагружает всю косметику. Требуется OP/cosmetic clearУдаляет всю косметику и сбрасывает кожу по умолчанию. Требуется OP
Регистрация косметики
! Предупреждение! Помните, что имя, которое вы даете файлам, важно!
Регистрация косметики довольно проста. Вам нужно будет сделать пакет активов (очевидно), и вам понадобится 3 файла:
- Косметическая модель .blockymodel
- Косметическая текстура .png
- Косметический значок .png, который является тем же значком, который вы бы использовали для этого предмета!
Эти файлы должны быть названы таким же образом, что и CustomID.extension.
Каждая косметика будет иметь свою собственную папку с такой структурой.
CustomID
недоброжелательность CustomID.blockymodel
Обсуждение CustomID.png
Икона / Icon
CustomID.png
Затем косметика пойдет в определенную папку, в зависимости от типа:
косметика
(такие вещи, как рубашки, шапки, брюки и т. Д.)
Основной путь для косметики — Общие/Ресурсы/Косметика, затем папка на основе слота, которая может быть:
мысУши_ДоступныеперчаткиГоловаFace_AccessoriesтрусысверхуШтаныобувьНаверхунижнее белье
Тогда папка, которую вы сделали раньше.
Итак, для косметики под названием Custom_Cape, которая находится в слоте для мыса, это будет выглядеть следующим образом:
Common/Resources/Cosmetics/Capes/Custom_Cape Внутри папки Custom_Cape:
Custom_Cape/
недоброжелательность Custom_Cape.blockymodel
недоброжелательность Custom_Cape.png
Икона / Icon
─ ─ Custom_Cape.png
Персонажи
(такие вещи, как рот, уши, глаза и т.д.)
Основной путь для косметики персонажа - Общие/ресурсы/характеристики, затем папка на основе слота, которая может быть:
БородыУшиБровиГлазалицаротстрижкаВолосы_расширениеКрыльяХвостыРогаFace_Details
Тогда папка, которую вы сделали раньше.
Итак, для косметического персонажа под названием Custom_Eyes, который находится в слоте для мыса, это будет выглядеть следующим образом:
Common/Resources/Cosmetics/Capes/Custom_Eyes Внутри обычаев_ Глазная папка:
Custom_Eyes
недоброжелательность Custom_Eyes.blockymodel
недоброжелательность Custom_Eyes.png
Икона / Icon
─ ─ Custom_Eyes.png
Слот Hair_Extension автоматически принимает тот же градиент, что и Hairstyle.
Варианты (факультативно)
! Предупреждение! Варианты и цвета являются взаимоисключающими!
! Предупреждение! Расширения волос не могут иметь вариантов или цветов, они меняются в зависимости от прически.
Этот API также позволяет добавлять варианты.
Чтобы добавить варианты, вам нужно будет добавить текстуру и значок в папку вашей косметики.
Вариант текстуры должен быть помещен в косметическую папку (CustomID) и назван следующим образом:
CustomID_Variant_VariantName.pngВариантные значки должны иметь то же название, что и вариантная текстура, но в отличие от текстуры, они должны быть размещены внутри. Икона/ папка.
Взять Пропеллера_ Шляпа как пример:
Пропеллер_ Шляпа?
Оригинальное название: Propeller_Hat.blockymodel
─ Propeller_Hat.png
Обсуждение Propeller_Hat_Variant_Circus.png
Недоброжелательность - Propeller_Hat_Variant_Rainbow.png
Икона / Icon
недоброжелательность Продавец_Hat.png
недоброжелательность Propeller_Hat_Variant_Circus.png
─ ─ Propeller_Hat_Variant_Rainbow.png
При этом API будет загружаться: Пропеллер_ шляпа, Propeller_Hat_Variant_Circus, Propeller_Hat_Variant_Rainbow.
Они будут рассматриваться API как варианты той же косметики, поэтому они будут неявно использовать их. Propeller_Hat.blockymodel
Цвета (необязательно)
! Предупреждение! Варианты и цвета являются взаимоисключающими!
! Предупреждение! Расширения волос не могут иметь вариантов или цветов, они меняются в зависимости от прически.
Этот API также позволяет добавлять несколько цветов в косметику.
Чтобы добавить цвета, вам нужно изменить папку вашей косметики следующим образом: Cosmetic_Id_Colors_GRADIENTSET
Текстура должна быть серой (полностью ненасыщенной).
Вот список всех пригодных градиентных наборов:
Цветной хлопокГлаза_ГрадиентИсполнитель: Faded_LeatherFantasy CottonFantasy_Cotton_DarkFlashy_синтетическийволосыЖан_ДженерикОрнаментация_МеталлПастель хлопокRotten_FabricИсполнитель: Shiny_Fabricкожа
Вот пример:
Название пункта: Образец_рубашка
Альтернатива: Цвета
Набор градиентов: Цветной хлопок
Название папки: Sample_Shirt_Colors_Colored_Cotton
Структура папки:
Sample_Shirt_Colors_Colored_Cotton
недоброжелательность Образец_shirt.blockymodel
недоброжелательность Источник: Shirt.png
Икона / Icon
─ ─ Источник: Shirt.png
Имена моделей, текстур и иконок должны быть просто именами без них. Цвета_GRADIENTSET
Advanced Cosmetics (необязательно)
Внутри вашей косметической папки вы можете добавить Cosmetic_Id.json Файл. Этот файл позволяет настроить еще больше вашей косметики.
В файле JSON вы можете изменить имя и путь модели, текстуру и иконку вашей косметики. И это еще не все, вы также сможете определить варианты и цветовые градиенты вашей косметики, и если косметика занимает больше, чем один слой!
{
"модель": "Ресурсы/Косметика/Голова/Пропеллер_Hat/Пропеллер_Hat.blockymodel",
"texture": "Resources/Cosmetics/Head/Propeller_Hat/Propeller_Hat.png",
"icon": "Resources/Cosmetics/Head/Propeller_Hat/Propeller_Hat_Icon.png",
"slot_overrides": [
// Вставьте здесь слоты, например «Голова», «Капсы» и т.д.
]
"альтернативы": {
2 ВСЕГДА ИСКЛЮЧИТЕЛЬНЫ, У ВАШИХ ВАРИАНТОВ ИЛИ КЛОРОВ!!!
Выбор 1 (цвета)
"gradient_set": "Волосы",
Выбор 2 (варианты)
"варианты": {
"Вариант": {
"texture": "Resources/Cosmetics/Head/Propeller_Hat/Variant/Variant.png",
"icon": "Resources/Cosmetics/Head/Propeller_Hat/Variant/Variant_Icon.png"
?
?
?
?
"модель" Это путь базовой косметической модели и любых ее вариантов.
"Текстура" Это путь базовой косметической текстуры и любых вариантов.
"Икона" Это путь базовой косметической иконы.
"альтернативы" Косметика имеет 1 из 2 альтернативных стилей.
Альтернативный вариант
«Альтернативы» > «варианты» Объявляет о наличии вариантов, которые будут перечислены.
"альтернативы" > "варианты" > "вариант1Имя" Будет заменено название первого варианта.
"альтернативы" > "варианты" > "вариант2Имя" Будет заменено название второго варианта.
Внутри названий вариантов, упомянутых выше, находятся определения компонентов вариантов.
"альтернативы" > "варианты" > "вариантное имя" > "текстура" Это путь текстуры рассматриваемого варианта.
"альтернативы" > "варианты" > "вариантное имя" > "иконка" Это путь иконы рассматриваемого варианта.
Цветная альтернатива
"альтернативы" > "gradient_set" Определяет игру, какой градиент использовать
Список градиентов:
Цветной хлопокГлаза_ГрадиентИсполнитель: Faded_LeatherFantasy CottonFantasy_Cotton_DarkFlashy_синтетическийволосыЖан_ДженерикОрнаментация_МеталлПастель хлопокRotten_FabricИсполнитель: Shiny_Fabricкожа
итальянец
Lalyan Cosmetic Core
Un'API per registrare e personalizzare cosmetici senza usare gli slot dell'armatura
Modello e texture del Custom Wardrobe sono fatti da Эфирный Шигуре.
Введение
Questo plugin permette ai giocatori di personalizzare quale cosmetico hanno equipaggiato, senza dover usare i loro slot dell'armatura
Исполнитель: Permette Anche ai Creatori di plugin di creare i loro cosmetici personalizzati, senza aver bisogno di alcun codice Java!
Il plugin fornisce una GUI per personalizzare i cosmetici, che può essere aperta tramite comando o, in un modo più immersivo, interagendo con il Guardaroba Cosmetico
Il Guardaroba Cosmetico può essere craftato in una Builder's Workbench con 4 di qualsiasi Hardwood
La GUI fornisce un modo semplice per selezionare cosmetici e varianti di cosmetici. Fai clic con il pulsante sinistro su un cosmetico per equipaggiarlo, se il cosmetico ha l'icona della variante, fai clic con il pulsante destro per aprire il menu delle varianti!
Команди
Il plugin ha alcuni comandi che sono principlemente a scopo di test:
/cosmetic apply <CosmeticId> [override]Приложение Manumente un erto cosmetico definito daКосметическая Id,отменятьè opzionale, il valore predefinito èДа [l'altro valore è no]Determina se tutti gli altri cosmetici del suo tipo devono essere rimossi. Ричиде ОП/косметические измененияapre manualmente l'interfaccia utente di personalizzazione dei cosmetici. Не богатый пермесси/косметический списокчат tutti gli ID dei cosmetici caricati. Ричиде ОП/косметическая перезагрузкаricarica manualmente tutti i cosmetici. Ричиде ОП/cosmetic clearrimuove tutti i cosmetici personalizzati e ripristina la skin predefinita. Ричиде ОП
Registrazione dei cosmetici
! Внимание! Ricordati che il nome che dai ad i files è importante!
Registrare un cosmetico è abbastanza semplice Dovrai creare un pacchetto di risorse (ovviamente), e avrai bisogno di 3 file essenziali:
- Файл .blockymodel del cosmetico
- Текстура .png del cosmetico
- L'icona .png del cosmetico, che è la stessa icona che useresti per l'oggetto!
Questi file devono essere nominati allo stesso modo, ovvero CustomID.extension
Ogni cosmetico avrà la sua cartella, conquesta struttura
CustomID
недоброжелательность CustomID.blockymodel
Обсуждение CustomID.png
Икона / Icon
CustomID.png
La cartella del cosmetico andrà messa all'interno di una certa cartella, seconda del tipo di cosmetico:
косметика
(cose come magliette, cappelli, pantaloni ecc..)
Il percorso base per i cosmetici Общие/Ресурсы/Косметика, seguito dalla cartella basata sullo slot, che può essere:
мысУши_ДоступныеFace_AccessoriesперчаткиГоловатрусысверхуШтаныобувьНаверхунижнее белье
Scegli quale di questi slots deve occupare il tuo cosmetico e inserisci la cartella che hai creato prima.
Quindi, per un cosmetico chiamato Custom_Capeche si trova nello slot мысil percorso sarà questo:
Common/Resources/Cosmetics/Capes/Custom_CapeИсполнитель: All'interno della cartella Custom_Cape:
Custom_Cape/
недоброжелательность Custom_Cape.blockymodel
недоброжелательность Custom_Cape.png
Икона / Icon
─ ─ Custom_Cape.png
Часть дель Персонаджо
(cose come bocca, orecchie, occhi ecc.)
Il percorso base per i cosmetici del personaggio è Общие/ресурсы/характеристики, seguito dalla cartella basata sullo slot, che può essere:
БородыУшиБровиГлазалицаротстрижкаВолосы_расширениеКрыльяХвостыРогаFace_Details
Scegli quale di questi slots deve occupare la tua parte per il personaggio e inserisci la cartella che hai creato prima.
Quindi, per un cosmetico del personaggio chiamato Custom_Eyesche si trova nello slot Глазаil percorso sarà questo:
Common/Resources/Characters/Eyes/Custom_EyesИсполнитель: All'interno della cartella Custom_Eyes:
Custom_Eyes
недоброжелательность Custom_Eyes.blockymodel
недоброжелательность Custom_Eyes.png
Икона / Icon
─ ─ Custom_Eyes.png
Hair_Extension prende automaticamente il gradiente del'acconciatura.
Varianti (Опционале)
! Внимание! Varianti e colori si escludono a Vicenda!
! Внимание! Le estensioni per i capelli (Hair_Extension) non possono avere varianti ne colori, cambiano a seconda del taglio di capelli!
Questa API ti consente anche di aggiungere delle varianti.
Per aggiungerle le varianti dovrai aggiungere le textures e le icone delle varianti all'interno della cartella del tuo cosmetico.
Le textures delle varianti devono essere messe nella cartella del cosmetico (CustomID) Номинация Come segue:
CustomID_Variante_NomeVariante.pngLe icone delle varianti devono avere lo stesso nome che abbiamo dato alla texture della variante ma a differentenza di essa andranno messe dentro la cartella Икона/.
Facendo un esempio con il Propeller Шляпа:
Пропеллер_ Шляпа?
Оригинальное название: Propeller_Hat.blockymodel
─ Propeller_Hat.png
Производитель: Propeller_Hat_Variant_Circo.png
Недоброжелательность - Propeller_Hat_Variant_Arcobaleno.png
Икона / Icon
недоброжелательность Продавец_Hat.png
Производитель: Propeller_Hat_Variant_Circo.png
─ ─ Propeller_Hat_Variant_Arcobaleno.png
Facendo così l'API caricherà: Пропеллер_ шляпа, Propeller_Hat_Variant_Circo* Propeller_Hat_Variant_Arcobaleno*
Saranno viste dall'API come varianti dello stesso cosmetico quindi implicitamente useranno Propeller_Hat.blockymodel Приходи, модель.
Колори (опсионале)
! Внимание! Varianti e colori si escludono a Vicenda!
! Внимание! Le estensioni per i capelli (Hair_Extension) non possono avere varianti ne colori, cambiano a seconda del taglio di capelli!
Questa API ti permette anche di aggiungere più colori a un cosmetico!
Per aggiungere colori devi cambiare la cartella del tuo cosmetico così: Cosmetic_Id_Colors_GRADIENTSET
La texture dev'essere una scala di grigi (комплемент десатурата)
ecco una lista di tutti i set di gradienti disponibili:
Цветной хлопокГлаза_ГрадиентИсполнитель: Faded_LeatherFantasy CottonFantasy_Cotton_DarkFlashy_синтетическийволосыЖан_ДженерикОрнаментация_МеталлПастель хлопокRotten_FabricИсполнитель: Shiny_Fabricкожа
Ecco un esempio:
Номе оггетто: Образец_рубашка
Альтернатива: Цвета
Установить градиент: Цветной хлопок
Il nome cartella è: Sample_Shirt_Colors_Colored_Cotton
La struttura delle cartelle è:
Sample_Shirt_Colors_Colored_Cotton
недоброжелательность Образец_shirt.blockymodel
недоброжелательность Источник: Shirt.png
Икона / Icon
─ ─ Источник: Shirt.png
I nomi di modello, texture e icona devono essere solo il nome senza Цвета_GRADIENTSET
Косметика Аванзати (opzionale)
All'interno della cartella del tuo cosmetico, puoi aggiungere un file CustomID.json (перенаправлено с «Cui CustomID è l'ID del tuo cosmetico») Questo file ti permetterà di personalizzare ancora di più i tuoi cosmetici.
All'interno del file JSON puoi cambiare il nome e il percorso del modello, della texture e dell'icona del tuo cosmetico. E non è tutto, potrai anche definire varianti o colorazioni del tuo cosmetico e decidere se occupa СЛОТ МУЛТИПЛИ!
Qui la formattazione corretta del cosmetico di esempio
{
"модель": "Ресурсы/Косметика/Голова/Пропеллер_Hat/Пропеллер_Hat.blockymodel",
"texture": "Resources/Cosmetics/Head/Propeller_Hat/Propeller_Hat.png",
"icon": "Resources/Cosmetics/Head/Propeller_Hat/Propeller_Hat_Icon.png",
"slot_overrides": [
//Inserisci gli slot qui, per esempio "Head", "Capes" ecc...
]
"альтернативы": {
/QUESTI 2 SONO MUTUALMENTE ESCLUSIVI, O USI LE VARIANTI O I COLORI!!!
Сельта 1 (Колори)
"gradient_set": "Волосы",
Сельта 2 (Варианти)
"варианты": {
"Вариант": {
"texture": "Resources/Cosmetics/Head/Propeller_Hat/Variant/Variant.png",
"icon": "Resources/Cosmetics/Head/Propeller_Hat/Variant/Variant_Icon.png"
?
?
?
?
"модель" É il percorso del modello di cosmetico base ed eventuali varianti.
"Текстура" É il percorso della texture di cosmetico base ed eventuali varianti.
"Икона" É il percorso dell'icona del cosmetico base.
"альтернативы" Дефиниция che il cosmetico ha 1 di 2 stili di alternative
Alternativa di Variete
«Альтернативы» > «варианты» Annuncia la presenza di varianti che saranno elencate.
"альтернативы" > "варианты" > "вариант1Имя" Andrà sostituito con il nome della prima variante.
"альтернативы" > "варианты" > "вариант2Имя" Andrà sostituito con il nome della seconda variante.
Dentro i nomi delle varianti qui sopra citati ci sono le definizioni dei componenti della variante.
«альтернативы» > «варианты» > «вариантное имя» > «текстура» É il percorso della texture della variante in questione.
«альтернативы» > «варианты» > «вариантное имя» > «иконка» Il percorso dell'icona della variante in questione.
Alternativa di Colorazione
"альтернативы" > "gradient_set" Il gradiente di colorazioni da usare
Lista dei gradienti:
Цветной хлопокГлаза_ГрадиентИсполнитель: Faded_LeatherFantasy CottonFantasy_Cotton_DarkFlashy_синтетическийволосыЖан_ДженерикОрнаментация_МеталлПастель хлопокRotten_FabricИсполнитель: Shiny_Fabricкожа
Показать оригинальное описание (English)
English
Lalyan Cosmetic Core
An API to register and customize cosmetics without using armor slots
Custom Wardrobe model and texture are made by EtherealShigure.
Introduction
This plugin allows players to customize which cosmetic they have equipped, without having to use up their armor slots
It also allows plugin makers to create their custom cosmetics, without needing any java code!
The plugin features a custom GUI to customize cosmetics, which can be opened by command or, in a more immersive way, by crafting the Cosmetic Wardrobe
The Cosmetic Wardrobe can be crafted in the Builder's Workbench using 4 of any Hardwood
The GUI provides an easy way to select cosmetics and cosmetic variants. Left-click on a cosmetic to equip it, if the cosmetic has the variant icon, right-click it to open the variant menu!
Commands
The plugin has some commands that are mainly for testing purposes:
/cosmetic apply <CosmeticId> [override]manually applies a certain cosmetic defined byCosmeticId,overrideis optional, default isyes [other value is no], determines whether all other cosmetics of its type should be removed. Requires OP/cosmetic changemanually opens the Cosmetic Customization UI. Does not require permissions/cosmetic listprints in chat all loaded cosmetic ids. Requires OP/cosmetic reloadmanually reloads all cosmetics. Requires OP/cosmetic clearremoves all custom cosmetics and resets the default skin. Requires OP
Registering cosmetics
!Warning! Remember that the name you give to the files is important!
Registering a cosmetic is quite simple. You'll need to make an asset pack (obviously), and will need 3 files:
- The cosmetic's .blockymodel
- The cosmetic's .png texture
- The cosmetic's .png icon, which is the same icon you would use for the item!
These files must be named in the same way, that being CustomID.extension
Each cosmetic will be its own folder, with this structure
CustomID/
├── CustomID.blockymodel
├── CustomID.png
└── Icon/
    └── CustomID.png
Then the cosmetic will go in a certain folder, depending on the type:
Cosmetics
(things like shirts, caps, pants etc..)
The base path for cosmetics is Common/Resources/Cosmetics, then the folder based on the slot, which can be:
CapesEars_AccessoriesGlovesHeadFace_AccessoriesOverpantsOvertopsPantsShoesUndertopsUnderwears
Then the folder you made before.
So, for a cosmetic called Custom_Cape, which is in the cape slot it would be like this:
Common/Resources/Cosmetics/Capes/Custom_Cape and inside the Custom_Cape folder:
Custom_Cape/
├── Custom_Cape.blockymodel
├── Custom_Cape.png
└── Icon/
    └── Custom_Cape.png
Characters
(things like mouth, ears, eyes etc..)
The base path for character cosmetics is Common/Resources/Characters, then the folder based on the slot, which can be:
BeardsEarsEyebrowsEyesFacesMouthHaircutsHair_ExtensionWingsTailsHornsFace_Details
Then the folder you made before.
So, for a character cosmetic called Custom_Eyes, which is in the cape slot it would be like this:
Common/Resources/Cosmetics/Capes/Custom_Eyes and inside the Custom_Eyes folder:
Custom_Eyes/
├── Custom_Eyes.blockymodel
├── Custom_Eyes.png
└── Icon/
    └── Custom_Eyes.png
The Hair_Extension slot automatically takes the same gradient as the Hairstyle.
Variants (optional)
!Warning! Variants and colors are mutually exclusive!
!Warning! Hair extensions cannot have variants nor colors, they changes according to the hairstyle!
This API also allows you to add variants.
To add variants, you will need to add the variant texture and icon inside your cosmetic's folder.
The variant textures must be placed in the cosmetic folder (CustomID) and named as follows:
CustomID_Variant_VariantName.pngThe variant icons must have the same name given to the variant texture, but unlike the texture, they must be placed inside the Icon/ folder.
Taking the Propeller_Hat as an example:
Propeller_Hat/
├── Propeller_Hat.blockymodel
├── Propeller_Hat.png
├── Propeller_Hat_Variant_Circus.png
├── Propeller_Hat_Variant_Rainbow.png
└── Icon/
├── Propeller_Hat.png
├── Propeller_Hat_Variant_Circus.png
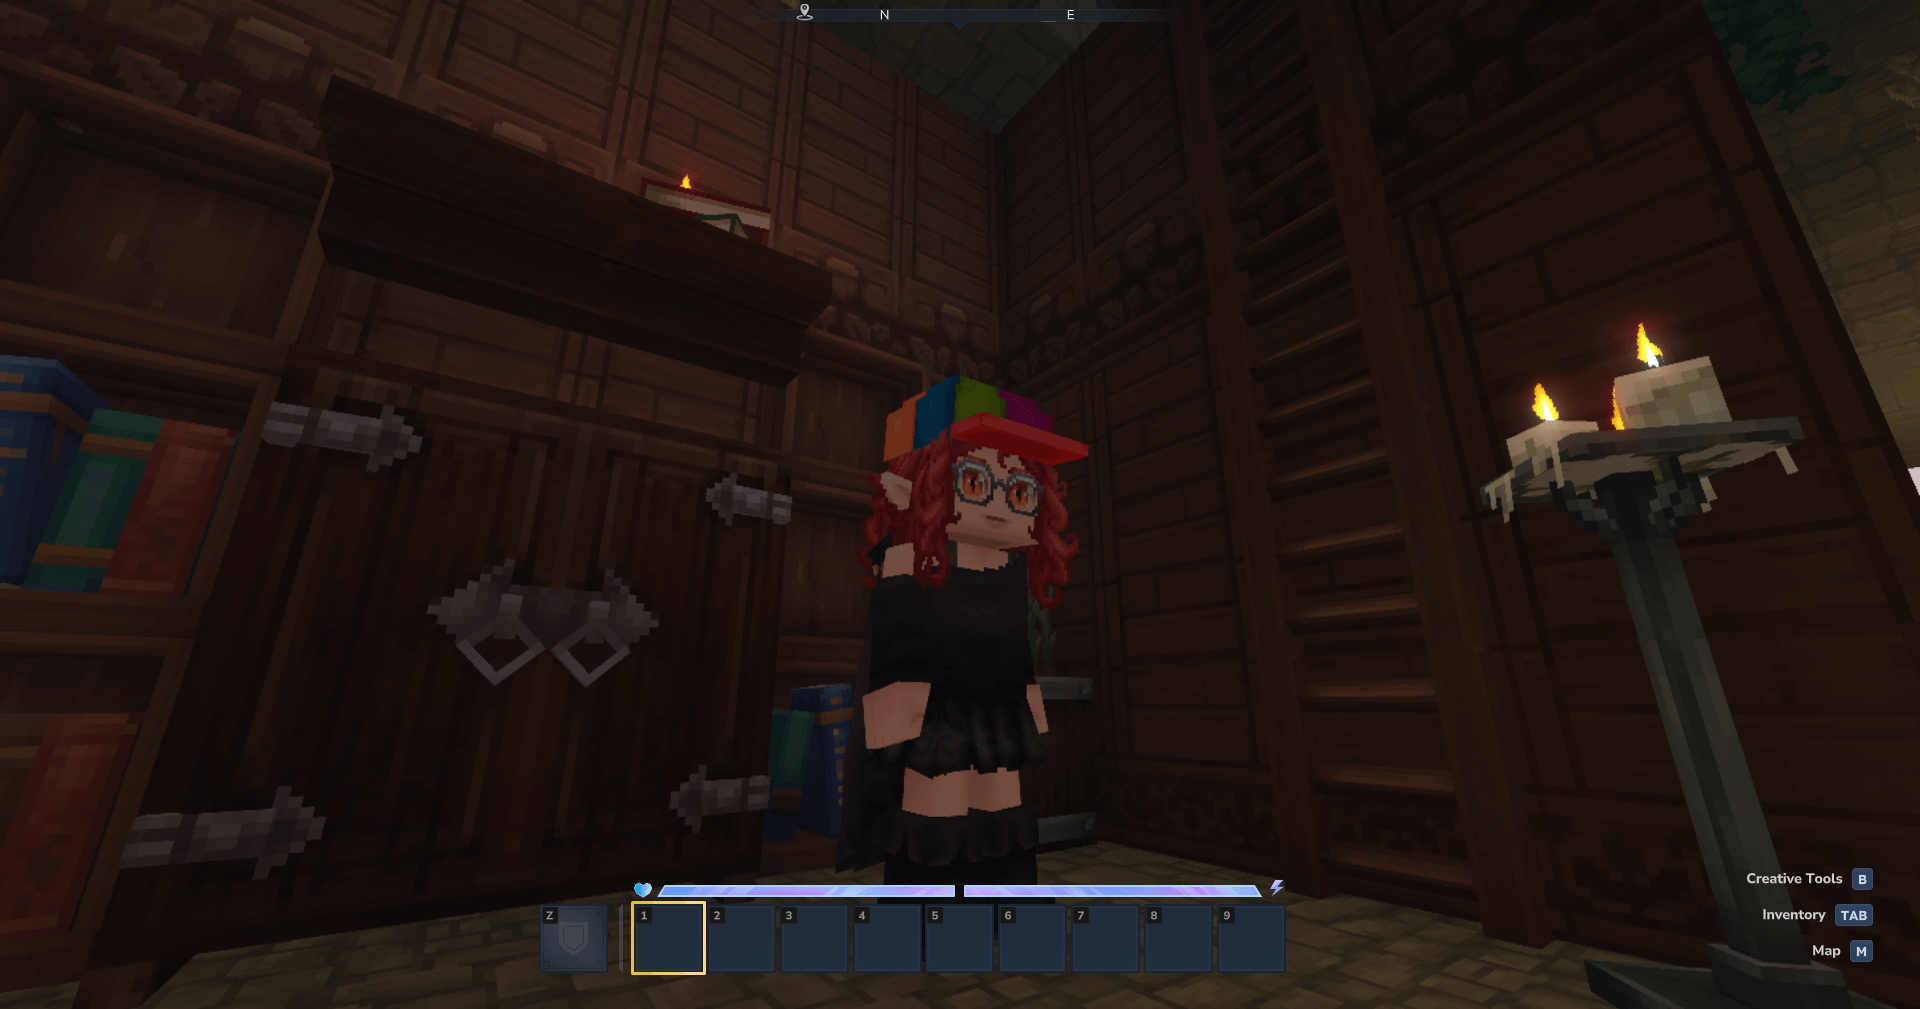
└── Propeller_Hat_Variant_Rainbow.pngDoing so, the API will load: Propeller_Hat, Propeller_Hat_Variant_Circus, Propeller_Hat_Variant_Rainbow.
They will be seen by the API as variants of the same cosmetic, so they will implicitly use Propeller_Hat.blockymodel
Colors (optional)
!Warning! Variants and colors are mutually exclusive!
!Warning! Hair extensions cannot have variants nor colors, they changes according to the hairstyle!
This API also allows you to add multiple colors to a cosmetic!
To add colors you need to change the folder of your cosmetic like this: Cosmetic_Id_Colors_GRADIENTSET
The texture has to be grayscale (completely desaturated).
here's a list of all aviable gradient sets:
Colored_CottonEyes_GradientFaded_LeatherFantasy_CottonFantasy_Cotton_DarkFlashy_SyntheticHairJean_GenericOrnamented_MetalPastel_CottonRotten_FabricShiny_FabricSkin
Here's an example:
Item name: Sample_Shirt
Alternative: Colors
Gradient Set: Colored_Cotton
The folder name is: Sample_Shirt_Colors_Colored_Cotton
The folder structure is:
Sample_Shirt_Colors_Colored_Cotton/
├── Sample_Shirt.blockymodel
├── Sample_Shirt.png
└── Icon/
    └── Sample_Shirt.png
model, texture and icon's names have to be just the name without _Colors_GRADIENTSET
Advanced Cosmetics (optional)
Inside your cosmetic folder, you can add a Cosmetic_Id.json file. This file allows you to customize even more your cosmetics.
Within the JSON file, you are able to change the name and path of the model, texture and icon of your cosmetic. And that's not all, you'll also be able to define variants and color gradients of your cosmetic and if the cosmetic occupies MORE THAN ONE SLOT!
{
    "model": "Resources/Cosmetics/Head/Propeller_Hat/Propeller_Hat.blockymodel",
    "texture": "Resources/Cosmetics/Head/Propeller_Hat/Propeller_Hat.png",
    "icon": "Resources/Cosmetics/Head/Propeller_Hat/Propeller_Hat_Icon.png",
    "slot_overrides": [
        //Insert slots here, for example "Head", "Capes" etc
    ],
    "alternatives": {
        //THESE 2 ARE MUTUALLY EXCLUSIVE, YOU EITHER HAVE VARIANTS OR COLORS!!!
        //Choice 1 (Colors)
        "gradient_set": "Hair",
        //Choice 2 (Variants)
        "variants": {
            "Variant": {
              "texture": "Resources/Cosmetics/Head/Propeller_Hat/Variant/Variant.png",
              "icon": "Resources/Cosmetics/Head/Propeller_Hat/Variant/Variant_Icon.png"
            }
        }
    }
}
"model" Is the path of the base cosmetic model and any variants.
"texture" Is the path of the base cosmetic texture and any variants.
"icon" Is the path of the base cosmetic icon.
"alternatives" Defines that the cosmetic has 1 of 2 alternative styles
Variant Alternative
"alternatives" > "variants" Announces the presence of variants that will be listed.
"alternatives" > "variants" > "variant1Name" Will be replaced with the name of the first variant.
"alternatives" > "variants" > "variant2Name" Will be replaced with the name of the second variant.
Inside the variant names mentioned above are the definitions of the variant components.
"alternatives" > "variants" > "variantName" > "texture" Is the path of the texture of the variant in question.
"alternatives" > "variants" > "variantName" > "icon" Is the path of the icon of the variant in question.
Color Alternative
"alternatives" > "gradient_set" Tells the game which gradient set to use
Gradient List:
Colored_CottonEyes_GradientFaded_LeatherFantasy_CottonFantasy_Cotton_DarkFlashy_SyntheticHairJean_GenericOrnamented_MetalPastel_CottonRotten_FabricShiny_FabricSkin
Italiano
Lalyan Cosmetic Core
Un'API per registrare e personalizzare cosmetici senza usare gli slot dell'armatura
Modello e texture del Custom Wardrobe sono fatti da EtherealShigure.
Introduzione
Questo plugin permette ai giocatori di personalizzare quale cosmetico hanno equipaggiato, senza dover usare i loro slot dell'armatura
Permette anche ai creatori di plugin di creare i loro cosmetici personalizzati, senza aver bisogno di alcun codice Java!
Il plugin fornisce una GUI per personalizzare i cosmetici, che può essere aperta tramite comando o, in un modo più immersivo, interagendo con il Guardaroba Cosmetico
Il Guardaroba Cosmetico può essere craftato in una Builder's Workbench con 4 di qualsiasi Hardwood
La GUI fornisce un modo semplice per selezionare cosmetici e varianti di cosmetici. Fai clic con il pulsante sinistro su un cosmetico per equipaggiarlo, se il cosmetico ha l'icona della variante, fai clic con il pulsante destro per aprire il menu delle varianti!
Comandi
Il plugin ha alcuni comandi che sono principalmente a scopo di test:
/cosmetic apply <CosmeticId> [override]applica manualmente un certo cosmetico definito daCosmeticId,overrideè opzionale, il valore predefinito èyes [l'altro valore è no], determina se tutti gli altri cosmetici del suo tipo devono essere rimossi. Richiede OP/cosmetic changeapre manualmente l'interfaccia utente di personalizzazione dei cosmetici. Non richiede permessi/cosmetic liststampa in chat tutti gli ID dei cosmetici caricati. Richiede OP/cosmetic reloadricarica manualmente tutti i cosmetici. Richiede OP/cosmetic clearrimuove tutti i cosmetici personalizzati e ripristina la skin predefinita. Richiede OP
Registrazione dei cosmetici
!Attenzione! Ricordati che il nome che dai ad i files è importante!
Registrare un cosmetico è abbastanza semplice. Dovrai creare un pacchetto di risorse (ovviamente), e avrai bisogno di 3 file essenziali:
- Il file .blockymodel del cosmetico
- La texture .png del cosmetico
- L'icona .png del cosmetico, che è la stessa icona che useresti per l'oggetto!
Questi file devono essere nominati allo stesso modo, ovvero CustomID.extension
Ogni cosmetico avrà la sua cartella, con questa struttura
CustomID/
├── CustomID.blockymodel
├── CustomID.png
└── Icon/
    └── CustomID.png
La cartella del cosmetico andrà messa all'interno di una certa cartella, a seconda del tipo di cosmetico:
Cosmetici
(cose come magliette, cappelli, pantaloni ecc..)
Il percorso base per i cosmetici è Common/Resources/Cosmetics, seguito dalla cartella basata sullo slot, che può essere:
CapesEars_AccessoriesFace_AccessoriesGlovesHeadOverpantsOvertopsPantsShoesUndertopsUnderwears
Scegli quale di questi slots deve occupare il tuo cosmetico e inserisci la cartella che hai creato prima.
Quindi, per un cosmetico chiamato Custom_Cape, che si trova nello slot Capes, il percorso sarà questo:
Common/Resources/Cosmetics/Capes/Custom_Cape, e all'interno della cartella Custom_Cape:
Custom_Cape/
├── Custom_Cape.blockymodel
├── Custom_Cape.png
└── Icon/
    └── Custom_Cape.png
Parti del Personaggio
(cose come bocca, orecchie, occhi ecc..)
Il percorso base per i cosmetici del personaggio è Common/Resources/Characters, seguito dalla cartella basata sullo slot, che può essere:
BeardsEarsEyebrowsEyesFacesMouthHaircutsHair_ExtensionWingsTailsHornsFace_Details
Scegli quale di questi slots deve occupare la tua parte per il personaggio e inserisci la cartella che hai creato prima.
Quindi, per un cosmetico del personaggio chiamato Custom_Eyes, che si trova nello slot Eyes, il percorso sarà questo:
Common/Resources/Characters/Eyes/Custom_Eyes, e all'interno della cartella Custom_Eyes:
Custom_Eyes/
├── Custom_Eyes.blockymodel
├── Custom_Eyes.png
└── Icon/
    └── Custom_Eyes.png
Lo slot Hair_Extension prende automaticamente il gradiente del'acconciatura.
Varianti (opzionale)
!Attenzione! Varianti e colori si escludono a vicenda!
!Attenzione! Le estensioni per i capelli (Hair_Extension) non possono avere varianti ne colori, cambiano a seconda del taglio di capelli!
Questa API ti consente anche di aggiungere delle varianti.
Per aggiungerle le varianti dovrai aggiungere le textures e le icone delle varianti all'interno della cartella del tuo cosmetico.
Le textures delle varianti devono essere messe nella cartella del cosmetico (CustomID) nominate come segue:
CustomID_Variant_NomeVariante.pngLe icone delle varianti devono avere lo stesso nome che abbiamo dato alla texture della variante ma a differenza di essa andranno messe dentro la cartella Icon/.
Facendo un esempio con il Propeller_Hat:
Propeller_Hat/
├── Propeller_Hat.blockymodel
├── Propeller_Hat.png
├── Propeller_Hat_Variant_Circo.png
├── Propeller_Hat_Variant_Arcobaleno.png
└── Icon/
    ├── Propeller_Hat.png
    ├── Propeller_Hat_Variant_Circo.png
    └── Propeller_Hat_Variant_Arcobaleno.png
Facendo così l'API caricherà: Propeller_Hat, Propeller_Hat_Variant_Circo, * Propeller_Hat_Variant_Arcobaleno*.
Saranno viste dall'API come varianti dello stesso cosmetico quindi implicitamente useranno Propeller_Hat.blockymodel come modello.
Colori (opzionale)
!Attenzione! Varianti e colori si escludono a vicenda!
!Attenzione! Le estensioni per i capelli (Hair_Extension) non possono avere varianti ne colori, cambiano a seconda del taglio di capelli!
Questa API ti permette anche di aggiungere più colori a un cosmetico!
Per aggiungere colori devi cambiare la cartella del tuo cosmetico così: Cosmetic_Id_Colors_GRADIENTSET
La texture dev'essere una scala di grigi (completamente desaturata)
ecco una lista di tutti i set di gradienti disponibili:
Colored_CottonEyes_GradientFaded_LeatherFantasy_CottonFantasy_Cotton_DarkFlashy_SyntheticHairJean_GenericOrnamented_MetalPastel_CottonRotten_FabricShiny_FabricSkin
Ecco un esempio:
Nome oggetto: Sample_Shirt
Alternativa: Colors
Set Gradiente: Colored_Cotton
Il nome cartella è: Sample_Shirt_Colors_Colored_Cotton
La struttura delle cartelle è:
Sample_Shirt_Colors_Colored_Cotton/
├── Sample_Shirt.blockymodel
├── Sample_Shirt.png
└── Icon/
    └── Sample_Shirt.png
I nomi di modello, texture e icona devono essere solo il nome senza _Colors_GRADIENTSET
Cosmetici Avanzati (opzionale)
All'interno della cartella del tuo cosmetico, puoi aggiungere un file CustomID.json (in cui CustomID è l'ID del tuo cosmetico). Questo file ti permetterà di personalizzare ancora di più i tuoi cosmetici.
All'interno del file JSON puoi cambiare il nome e il percorso del modello, della texture e dell'icona del tuo cosmetico. E non è tutto, potrai anche definire varianti o colorazioni del tuo cosmetico e decidere se occupa SLOT MULTIPLI!
Qui la formattazione corretta del cosmetico di esempio
{
    "model": "Resources/Cosmetics/Head/Propeller_Hat/Propeller_Hat.blockymodel",
    "texture": "Resources/Cosmetics/Head/Propeller_Hat/Propeller_Hat.png",
    "icon": "Resources/Cosmetics/Head/Propeller_Hat/Propeller_Hat_Icon.png",
    "slot_overrides": [
        //Inserisci gli slot qui, per esempio "Head", "Capes" ecc...
    ],
    "alternatives": {
        //QUESTI 2 SONO MUTUALMENTE ESCLUSIVI, O USI LE VARIANTI O I COLORI!!!
        //Scelta 1 (Colori)
        "gradient_set": "Hair",
        //Scelta 2 (Varianti)
        "variants": {
            "Variant": {
              "texture": "Resources/Cosmetics/Head/Propeller_Hat/Variant/Variant.png",
              "icon": "Resources/Cosmetics/Head/Propeller_Hat/Variant/Variant_Icon.png"
            }
        }
    }
}
"model" È il percorso del modello di cosmetico base ed eventuali varianti.
"texture" È il percorso della texture di cosmetico base ed eventuali varianti.
"icon" È il percorso dell'icona del cosmetico base.
"alternatives" Definisce che il cosmetico ha 1 di 2 stili di alternative
Alternativa di Variante
"alternatives" >"variants" Annuncia la presenza di varianti che saranno elencate.
"alternatives" >"variants" > "variant1Name" Andrà sostituito con il nome della prima variante.
"alternatives" >"variants" > "variant2Name" Andrà sostituito con il nome della seconda variante.
Dentro i nomi delle varianti qui sopra citati ci sono le definizioni dei componenti della variante.
"alternatives" >"variants" > "variantName" > "texture" È il percorso della texture della variante in questione.
"alternatives" >"variants" > "variantName" > "icon" È il percorso dell'icona della variante in questione.
Alternativa di Colorazione
"alternatives" > "gradient_set" Il gradiente di colorazioni da usare
Lista dei gradienti:
Colored_CottonEyes_GradientFaded_LeatherFantasy_CottonFantasy_Cotton_DarkFlashy_SyntheticHairJean_GenericOrnamented_MetalPastel_CottonRotten_FabricShiny_FabricSkin
Последние версии
Lalyan Cosmetic Core 1.6.0
Lalyan Cosmetic Core 1.5.2
Lalyan Cosmetic Core 1.5.1
Lalyan Cosmetic Core 1.5.0
Lalyan Cosmetic Core 1.4.0
Информация
Авторы:
Версии игры:
Создан: 18.01.2026